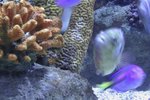
Live rock consists of dead coral colonized by other organisms. Importantly, live rock usually contains bacteria that eat ammonia and nitrite, toxic biological waste produced by saltwater organisms, providing critical biological filtration. Other, larger organisms in live rock die off when the rock is shipped to a fish store; "curing" live rock is the process of allowing these organisms to rot away, making the live rock safe for an aquarium. Uncured live rock is much cheaper than cured rock but requires you to cure the rock yourself.
Step 1
Inspect the rock and remove any obviously dead organisms. You will probably not get everything, and that's OK -- it's part of what the cycling process is intended to correct.
Step 2
Position all of your live rock in your aquarium where you want it in the final setup. Secure rocks together with aquarium putty if necessary.
Step 3
Adjust your protein skimmer to produce a wet skimmate. The specifics on how to adjust it will vary depending on your exact model of skimmer. Follow the manufacturer's instructions.
Step 4
Test the water daily for ammonia, nitrite and nitrate. You should see ammonia spike first, then the nitrite. Then they'll drop. If the ammonia and nitrite levels remain unchanged for several days, test the pH and calcium levels. The pH should be between 8.2 and 8.4 and the calcium should remain from 380 to 450 mg/L.
Step 5
Perform a 50 percent water change once the ammonia and nitrite levels hit zero. Now that the rock is cured, you may add fish and invertebrates.
References
Tips
- Get in the habit of checking the plumbing and filters, cleaning prefilters and testing the water while you are waiting for the rock to cure.
- Always secure live rock with aquarium putty; the rock can topple and break the tank otherwise. Do not rest rocks directly against the sides of bottom of the tank.
Warnings
- High-grade live rock may contain dangerous hitchhikers like mantis shrimp and rock anemones. If you see tiny brown or clear anemones, inject them with kalkwasser; if you see mantis shrimp, get a shrimp trap.
- Do not cure live rock in a tank with fish; most saltwater fish cannot survive the ammonia and nitrite spikes the curing process produces.
- Do not cure live rock in a freshwater tank. Live rock only works in saltwater and this will ruin the rock.
Photo Credits
-
Jupiterimages/liquidlibrary/Getty Images