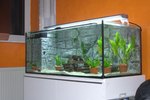
An upside-down fish tank is a unique use of two tanks together that lets your fish swim inside the inverted tank above the water level in the exterior tank. The pressure inside the overturned tank draws the water up higher than the level outside. It provides a clever visual effect, but if you don't know how to fill an inverted fish tank, it can be tricky to fill without making a watery mess.
The Trick
You'll use a flexible plastic air hose to suck the air out of your inverted fish tank as it fills with water. The tip of the air hose has to rise with the water level for you to be able to suck all of the air out of the top of the upside-down tank, so you'll need to attach a float to the end. Cut a small square from a piece of Styrofoam, about 1 to 1 1/2 inches square, and poke a hole through the middle to accommodate the air hose. You could also use a Styrofoam packing peanut and just poke a hole through it for the hose. Make sure that the hole is large enough for the air hose to fit into, but small and snug enough to keep the hose from slipping out.
Filling the Tank
To fill your upside-down fish tank, fill a main tank or tray that is shallower than your inverted tank halfway with water. Put the upside-down tank in place inside the main tank or tray, then slide the end of the air hose with the float on it down into the water and up into the upside-down tank. Feed the hose enough slack so that the float takes the end of the hose to the top of the water level inside the inverted tank. Put the other end of the hose into your mouth and begin sucking the air to draw it out of your inverted tank as you feed water into the outer tank. The water level inside the inverted tank will rise, drawing from the outer tray as you suck the air out. It's best to leave some air in the top of the inverted tank for the fish to breathe when they're swimming inside it.
Monitor the Exterior Water Level
Water evaporates, especially if the temperature is warm, so you'll need to keep an eye on the water level in your exterior tank or tray. Make sure it always remains above the access to the upside-down tank, filling it as needed to maintain the water levels inside and outside of your inverted tank.
Water Change Frequency
You need to keep the water in your inverted fish tank fresh for your fish to thrive. That means changing the water at least once a week. Just siphon the majority of the old water out of the exterior tank using a hose and a bucket, then replenish the tanks with fresh water using the air hose method to draw water up into the upside-down tank while drawing air out.
References
Photo Credits
-
Jupiterimages/Photos.com/Getty Images
Writer Bio
Elle Di Jensen has been a writer and editor since 1990. She began working in the fitness industry in 1987, and her experience includes editing and publishing a workout manual. She has an extended family of pets, including special needs animals. Jensen attended Idaho and Boise State Universities. Her work has appeared in various print and online publications.