Things You'll Need
8-foot 4-by-4
10-foot 2-by-6
Drill
Screws
Post hole digger
Level
String
Tamp
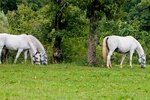
A three-rail wooden fence creates an attractive, safe area for your horses to roam and graze. By placing the bottom rail 18 inches from the ground, you prevent decay of the rails and make it easier to trim grass and weeds that will grow around the fence. Before you begin building your fence, know where your property lines are and obtain any township or county permits required in your area.
Measure the perimeter of the pasture area. Divide this length by eight. This will give you the number of fence posts needed to make the three-rail wooden horse fence. Take the number of fence posts times three plus eight (cross braces) to determine the number of 2-by-6 rails needed.
Mark all the posts at 48 inches, 66 inches, 78 inches, and 90 inches.
Dig a hole at each end of the fence row, using a post hole digger.
Place a 4-by-4 post up to the 48-inch mark on the pole in each hole. Level the post and use a tamp to pack the dirt around the post.
Tie a string between the two end posts. This will give you a guide for a straight fence line.
Dig a hole every 8 feet along the string. Place a 4-by-4 post in every hole up to the 48-inch mark on the pole. Level the post and pack the dirt around the post with a tamper.
Screw a 2-by-6 into the end post at the bottom mark of 66 inches. Screw the other end of the 2-by-6 into the pole to the right of the end post. The end of the 2-by-6 should be in the center of the 4-by-4 post. Continue around the perimeter.
Screw a 2-by-6 into the end post at the bottom mark of 78 inches. Screw the other end of the 2-by-6 into the pole to the right of the end post. The end of the 2-by-6 should be in the center of the 4-by-4 post. Continue around the perimeter.
Screw a 2-by-6 into the end post at the bottom mark of 90 inches. Screw the other end of the 2-by-6 into the pole to the right of the end post. The end of the 2-by-6 should be in the center of the 4-by-4 post. Continue around the perimeter.
Create a brace, using a 2-by-6 at each corner. The bottom of the 2-by-6 should start at the corner pole and the top should attach to the first pole next to the corner. Place a brace on both sides of the corner post.