Things You'll Need
Wire mesh fencing
Pressure-treated wood poles
Post hole digger
Tamper
Wire splicer
Lap-type sleeves
Hammer
How to Build a Miniature Horse Enclosure. Building a pen for miniature horses is very similar to the process for building a regular-sized horse fence, with different measurements. Miniature horses don't need a lot of space, but do need to be protected from predators. Erecting a wire mesh fence to keep them enclosed is a project you can take on yourself with the help of a few friends. Read on to learn how to build a miniature horse enclosure.
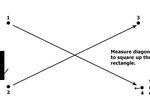
Start with an outdoor space that is about 20 by 30 feet, preferably level.
Purchase a roll of wire mesh fencing from a home improvement store. The wire mesh should have openings no larger than 2 x 4 inches; miniature horses' hooves can fit through smaller openings than those of regular-sized horses. Wire mesh is springy, so your horses won't be injured if they run into it, and since it's galvanized, it won't rust. The fencing should reach to about 4 feet in height.
Choose smooth, pressure-treated wood poles. The corner poles should be 7 inches long and 8 inches square, while the line posts should be 5 1/2 to 6 inches long and 5 inches to 7 inches square.
Use a post hole digger to dig holes for the posts. Tamp the ground inside and around the hole well before inserting the posts. Use concrete to stabilize the posts if the ground in your area is sandy or wet. If you live in an area where the ground freezes in the winter, the posts should be installed below the frost line to prevent shifting.
Put the corner posts into place first. Note that 24 to 36 inches of the post should be underground.
Set the line posts in 7 x 10 inch intervals.
Attach the fencing material to the inside facing of the posts to prevent the horses from pushing the fence off the posts. The smooth side should face toward the horses. To start, unroll the fence and position it along the fence line.
Cut vertical wires about a foot from the starting end of the fence and wrap the horizontal wire around the end post.
Staple down each line of wire diagonally into both the outside and inside of the post. The bottom wire of the fencing should be no higher than 2 inches off the ground.
Wrap the horizontal wires around the corresponding wires on the fence line three or four times and crimp the ends with pliers or a crimping tool. Trim any excess wire.
Stretch the fence slowly and carefully to the next post. Make sure the fence is as straight as possible before stapling. You can use a tractor-adaptable stretcher or a hand stretcher. If you're using a hand stretcher, install a wood dummy post 4 to 5 feet past the pull post; secure it with a heavy brace. Slowly stretch the fence between the pull post and the dummy post.
Staple the fence line wires to the center of the line posts one at a time, starting at the bottom.
Use a claw hammer to crimp the fence horizontally and make the wire tight.
Splice the ends of the fencing together using lap-type sleeves and a splicing tool.
Top the fence off, if desired, with a sight line. You can use 1 1/8 by 6 inches top board in 16 foot lengths, PVC or metal pipe or barbless cable.
Tips
If the ground isn't level, use string and a level tool to make sure you are installing the posts at the correct height.
Warnings
Check with your county officials to determine if there are any zoning or permit considerations before beginning your project.
Writer Bio
This article was written by the CareerTrend team, copy edited and fact checked through a multi-point auditing system, in efforts to ensure our readers only receive the best information. To submit your questions or ideas, or to simply learn more about CareerTrend, contact us [here](http://careertrend.com/about-us).