Things You'll Need
1 board measuring 2 inches by 1 inches
1 board measuring 2 inches by 4 inches
Carpenter’s pencil
Measuring tape
Jig saw
Drill
10 screws
Marine grade glue
Heavy waterproof canvas
High-density foam
Upholsterer’s staple gun
Upholsterer’s staples
Canvas
Strips of rawhide leather
Equine tack breeching straps
Equine tack breast collar
2 Equine tack cinches
Army surplus ammunition boxes
Bungee cord
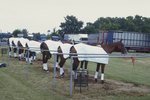
If you plan to trek with pack animals through national parks or the backcountry, you will need a good pack saddle. The most common type is the sawbuck pack saddle, so named because the frame resembles a carpenter’s sawbuck. Although a pack saddle can be bought at an outfitter, you can easily build one yourself.
Select high-quality boards in which the grain is straight and there are no knots or blemishes. Cut each board into four 20-inch pieces.
Lay two of your one-inch by two-inch boards at a 90-degree angle from one another, with the top ends overlapping. Use a carpenter’s pencil to mark the boards where they overlap.
Create a mortise joint in these overlapping boards by notching the ends where you have marked. To do this, cut about half of the board away so that the two boards fit together like corners of a Lincoln Log set. Repeat this process for the second set of one-inch by two-inch boards.
Join the two sets of boards together using marine glue. Wait for the glue to dry and then reinforce the joints with wood screws.
Lay your two-inch by four-inch boards across the inside of the sawbuck ends to form crossbeams. The lowermost crossbeam should align with the end of the sawbuck arm. The uppermost crossbeam should be four inches above this. Mark the boards where they overlap the sawbuck arms.
Create mortise joints in the sawbuck arms and the crossbeams, just as you did in step three
Cover the crossbeams with high-density foam, stapling it in place with the upholsterer’s staple gun. Then cover the crossbeams and the foam with the canvas. Glue strips of rawhide leather over the staples to hide them. Leave the mortised wood joint at the end uncovered so that you can attach it to the sawbuck frame.
Glue the ends of the crosspieces to the sawbuck along the mortised joints. Wait until dry and then use screws to reinforce the joints.
Attach breeching collar, breast collar and cinches in place, using the buckles and fasteners that come with the tack. Before placing the pack saddle on the equine, use a blanket to pad the saddle. Then place the saddle on the horse’s back and hold in place with cinches and collars. Attach ammunition boxes to the outside of the crosspieces with bungee cords to act as panniers. Be certain to distribute the weight evenly to prevent the saddle from slipping.
References
Resources
Writer Bio
Tracy Morris has been a freelance writer since 2000. She has published novels and numerous online articles. Her work has appeared in national magazines and newspapers including "Ferrets," "CatFancy," "Lexington Herald Leader" and "The Tulsa World." She holds a Bachelor of Arts in journalism from the University of Arkansas.