Things You'll Need
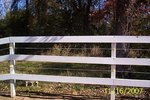
Horse panels
Panel pins
Bailing wire
Plywood
Drill
12-foot metal or wooden posts (if your horse stall is permanent)
T-posts (if your stall is portable)
Post-hole digger or auger or T-post driver
Concrete
Corral panels are some of the handier pieces of livestock equipment a farm owner can purchase. They have a multitude of uses, and are easy to handle, assemble, move and remove. Used in everything from creating arenas and round pens to making horse stalls, corral panels are handy, affordable and a great investment. One of the most common uses of corral panels is building portable horse stalls.
If your stalls are going to be permanent, start by setting your corner posts. These will be at all four corners of your stall's edges, and you can determine their placement by measuring the length of the panels you have purchased. Using your auger or your post-hole digger, dig your holes to a depth of at least 24 inches; be sure to set your posts in concrete inside the holes. These posts, whether metal or wood, need to set for at least 72 hours before you do any more work.
If your horse stalls are going to be portable, you can either just use the locking pins on the panels themselves, or you can drive T-posts into the ground and attach them to the panels for a touch of extra stability.
Stand the panels upright and connect them using the panel pins. Corral panels are made for ease of use, and standing them up and lining up the pins is easy enough for one person to do alone. Once the pins are in place, take the additional precaution of using bailing wire to secure the pins in place. This way if a horse stomps or knocks the panels, the pins will not be dislodged.
Secure the panels to the posts with bailing wire. If your stalls are permanent, be sure to wire them top, middle and bottom. If your stalls are temporary, one wire in the middle is sufficient. Cut off any excess wire and blunt the tips of the exposed wire, as these tend to be sharp and can cut a horse severely, even damaging their eyes in rare cases.
Use bailing wire to attach bucket holders to the fence panels. Be sure to do this before attaching the plywood as advised in Step 5, as once the plywood is up and wired securely, there may not be much room to run additional wire. If your stall is temporary and you are not using plywood, wiring buckets to the panels will be a cinch.
To make sure your permanent horse stalls are as durable and solid as possible, shore them up with plywood pieces to keep the horses from kicking through the panel slats. Drill holes in the top and bottom corners of the plywood and in the center. Then run wire through these holes, and use the wire to attach the plywood securely to the corral panels.
Tips
Lay out your fence panels in the form of the stalls to be created. This way you have measurements right there on the ground in front of you.
Warnings
Always use safety precautions when working with fencing or electrical equipment.
References