Things You'll Need
Measuring tape
Paper for pattern
Scissors
Fabric
Cotton batting
Pins
Sewing machine
Pencil
Three new or recycled cloth or nylon belts
Nylon webbing, 1 1/2-inch wide
Two snap hooks
Two D rings
Warnings
Keep scissors away from children.
Tips
Create blankets of various weights for your horses.
Consider recycling hardware from worn blankets prior to discarding.
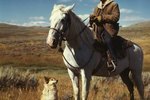
Your horse won't grab a parka from the coat closet prior to venturing out in inclement weather, but the need may arise for your horse to have protection from the elements. Horse rugs, also referred to as horse blankets can put a dent in your horse paraphernalia budget, but a DIY blanket can save you a bit of money and allow you to custom fit your beloved equine.
Measure your horse to determine how much fabric you'll need. Using the measuring tape, measure from the center of your horse's chest under his neck to his hindquarters. Note this measurement. Measure from the horse's withers to the tail and note this measurement. The withers is the ridge between your horse's shoulder blade. Lastly, measure from the horse's withers to the largest part of the barrel of his chest, around his body, between his front and rear legs. Note this measurement.
Trace out the pattern based on your measurements, visualizing the shape of a horse blanket as you do. If you have an old blanket, use that as a pattern.
Lay the pattern over your horse to determine if your measurements are correct and your neck hole is large enough. If your measurements are not correct, it's easier to adjust your paper pattern than your finished rug.
Lay out your pattern on your fabric. Leave an extra inch wherever you'll need a hem. Consider a fabric for the interior of the rug that won't slip. You may choose a waterproof fabric for the exterior, but bear in mind that a waterproof fabric doesn't breathe. Your horse may become overheated if he's wearing the blanket for an extended period of time.
Pin your pattern to your fabric, and cut around it. Repeat this process with the batting.
Lay out your fabric with the interior fabric on the bottom with the right side of the fabric facing upward. Lay your batting between, and your outer fabric on top with the right side of the fabric facing down. Pin around the fabric, leaving approximately 1 foot of fabric unpinned. You'll need to leave an opening to turn your rug right side out.
Sew your rug using your sewing machine. Consider using a zigzag stitch to reinforce your seams. When completed, remove pins and turn your rug right side out by carefully pulling the rug through the unpinned opening. Pin the opening closed and stitch.
Cut your belts in half.
Lay your blanket over your horse to determine the proper location of your straps. Mark your blanket where your chest straps under your horse's neck will be placed, where the strap under the tail will be placed, and where the straps around the barrel of his chest will be placed.
Remove the blanket from your horse.
Pin the half of the belt with the buckle to the left side of the blanket at the mark under your horse's chin. Pin the other half with the holes in the belt to the opposite side of the blanket across from the mark. You'll close the blanket by buckling the belt. Place a second belt in the same fashion, 4 inches below the first belt. Pin the third belt at the marks where your blanket will close under your horse's tail.
Sew all the belts into place.
Cut four 10-inch pieces of nylon webbing. Pin each piece to the marks you made where the blanket will close at the barrel of your horse's chest. Sew these pieces into place.
Thread the nylon webbing on the left side of the blanket through the snap hook. Fold this over, and stitch. Repeat with the other piece of webbing on the left side, and the other snap hook. Attach the D rings to the nylon webbing pieces on the right side. Fold the nylon webbing over and stitch.
References
Tips
- Create blankets of various weights for your horses.
- Consider recycling hardware from worn blankets prior to discarding.
Warnings
- Keep scissors away from children.
Photo Credits
-
steverts/iStock/Getty Images